My Account
Actions & Action Templates
How to Change Your Commerce Type
Inviting New Users
Managing Notifications
Partnership Billing Settings
Passwordless Sign-in
Privacy Policy
Setting Billing Address
Signing Up
Single Sign-On (SSO)
Switching Between Accounts
Terms of Service
Viewing Subscription Info
Buyers
Automating Price List Creation via Actions
Buyer Product Validation Guide
Check Order Status
Downloading Assets
Inviting Sellers
Packing Slips - Buyers
Selecting Products
Seller SLAs
Shopify Product Syncing
Signing Up As A Buyer
Step by Step for Buyer Onboarding
Syncing Order Updates
Wholesale Guide for Buyers
Sellers
Onboarding
Adding Partners
Connecting Your Platform
Exclusive Collaborations - Syncing Unpublished Products
Fixing SKUs in Scientific Notation
How to Set Up Pricing
Marking Products as Active or Inactive
Seller Quickstart Guide
The 4Ps of Seller Onboarding
Resources
Adding Barcode Values in WooCommerce
Creating Product SKUs
Downloadable Image Links
Handling Returns
How Invoicing Works
Importing Products
Inviting Customers
Manual Fulfillment
Packing Slips - Sellers
Taxes and Manual Invoicing
Wholesale Guide for Sellers
Editing Price Lists
Sending Test Orders
Step by Step for Seller Onboarding
Integrations
WooCommerce
Shopify
EDI
Connecting through Seller EDI - Invoice (810) Specification
Connecting through Seller EDI for Dropship
Connecting through Seller EDI for Dropship - Advance Ship Notice (856) Specification
Connecting through Seller EDI for Dropship - Inventory Update (846) Specification
Connecting through Seller EDI for Dropship - Purchase Order (850) Specification
Connecting through Seller EDI for Dropship - Purchase Order Acknowledgements (855) Specification
Connecting through Seller EDI for Wholesale - Advance Ship Notice (856) Specification
Connecting through Seller EDI for Wholesale - Purchase Order (850) Specification
Webhooks
Building API Integrations
Connecting BigCommerce
Connecting Easypost
Connecting Magento 2 - Buyer
Connecting Magento 2 - Seller
Connecting through SFTP
Getting Started with the Buyer API
How Inventory Sync Works
Integrating your CRM
Supported Connection Methods
Updating Shipping Information
Security
Tutorials
Downloading EDI Files related to Purchase Orders
How To Update All Margins In A Price List
How can I confirm that Convictional can pull my Products from my WooCommerce Store?
How to Create a Test Order as an EDI Seller
How to Resend an Advance Ship Notice
How to Resolve " Your SFTP user requires delete permission on your SFTP server."
How to Resolve "Already Processed Files"
How to Resolve "Unable to access your SFTP server"
How to Resolve "Your SFTP user requires read permission on your SFTP server"
How to Resolve "Your SFTP user requires write permission on your SFTP server."
How to check if you are a buyer or seller on Convictional?
Migrating Ecommerce Platforms
Troubleshooting
Table of Contents
- All Categories
- Sellers
- Onboarding
- Adding Partners
Adding Partners
Updated
by Jared Smith
This guide covers how to accept invitations to trade with new partners as well as how to create your own partners. A partner is any other business that you trade with using Convictional.
Before partners can start selling your products, they need information about your catalogue. You already set up your Products and attached Prices to your catalogue. Now it's time to share this information with a partner.
If You Were Invited By A Partner
Navigate to your Partners page
The partner who invited you will be listed as one of your preset partners. Click on their entry.
You will see a screen that looks like the image below. Click into the price list box and choose the price list you created for this specific partner.

Click save in the top right corner. You'll then see a "Your partner has been updated." message.
You will now have assigned your price list to this partner. Your products will be visible for them to select and list in their ecommerce store.
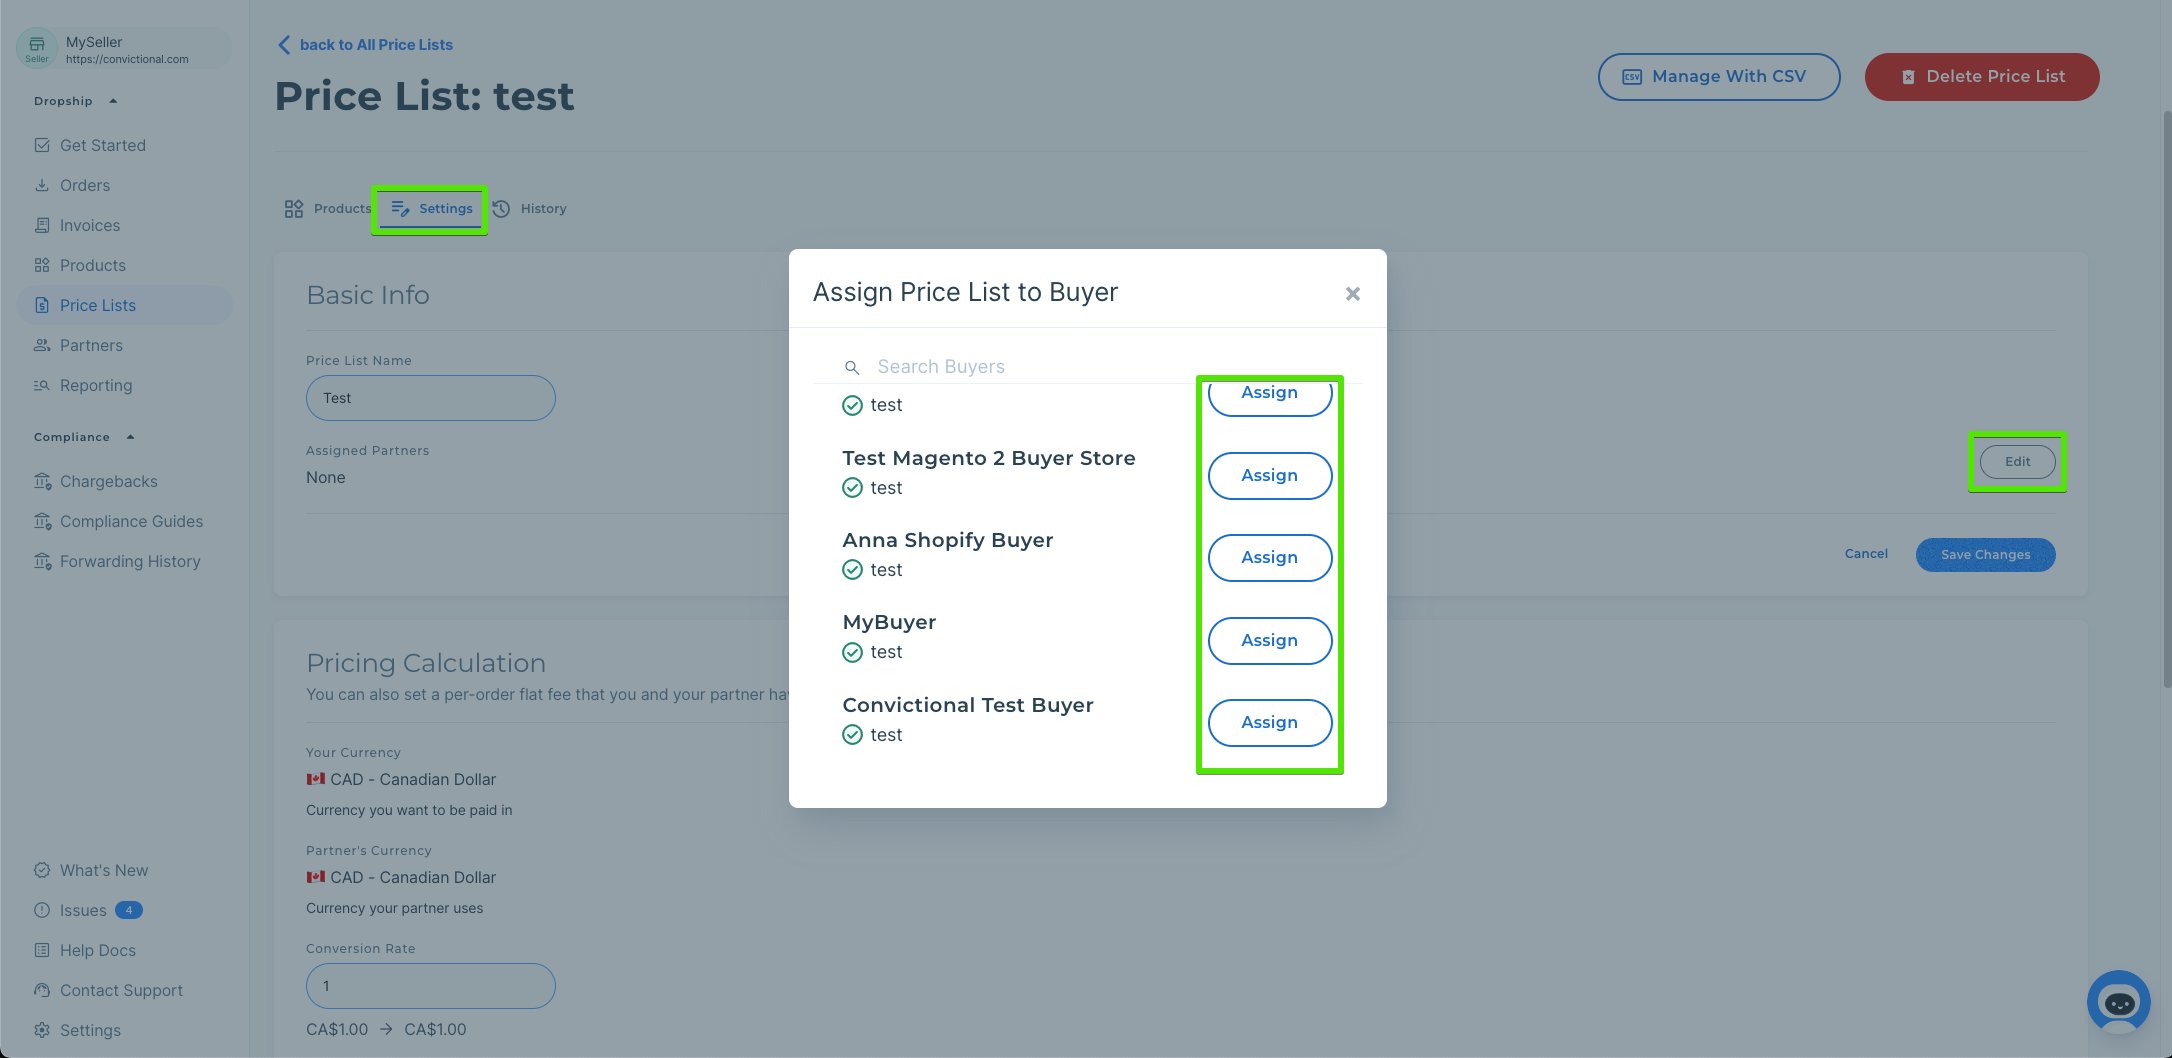
You can also assign a price list to a partner directly within the price list itself. When you have the price list open, there is an option to assign it to a buyer on the far right hand side. Under "Buyers Assigned this List" click the edit button and assign a buyer directly from there.

If You Want To Create A New Partner
Navigate to your Partners page.
On the far right hand corner you will see the option to invite a new partner.

Simply fill in the partners email address and choose the price list you'd like assigned to them, then click invite. Your partner will get a notification that you've invited them to trade.
Next Steps
If the buyer is already using Convictional, they'll then be connected with you right away.
If the buyer is not already using Convictional, they'll need to signup for an account by following the signup link that is automatically included in your invitation email.